本章正式进入项目开发环节,将带大家完整的实现项目中的首页,涵盖的功能点包含header组件拆分、iconfont引入、多区块轮播、热销推荐及周末游等展示模块。
宽带750px
按照iPhone6的2倍图
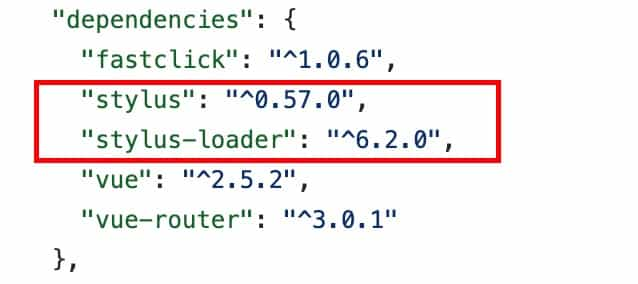
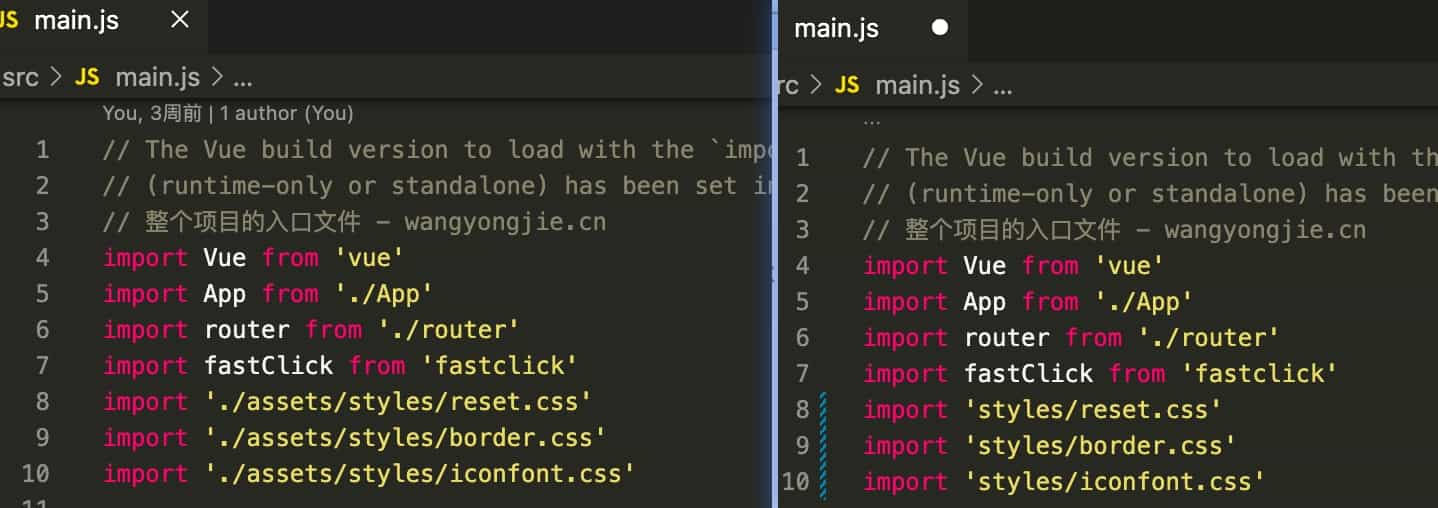
stylus 安装
Stylus 是一款 CSS 的预处理器,也就是我们常说的 CSS 框架
https://www.stylus-lang.cn
CSS的预处理框架,即将stylus转换为css使用, 可以使用变量
stylus-loader 安装
1
| npm i stylus-loader --save
|
让webpack理解stylus
局部组建使用
组建下面声明局部组建
1
2
3
4
5
6
| export default {
name: 'Home',
components: {
HomeHeader: HomeHeader
}
}
|
与下面相同
1
2
3
4
5
6
| export default {
name: 'Home',
components: {
HomeHeader
}
}
|
home-header == HomeHeader
scoped css样式只对当前组建生效
1rem = html font-size = 50px
86/100 = .86rem
lang="stylus"报错
报错截图
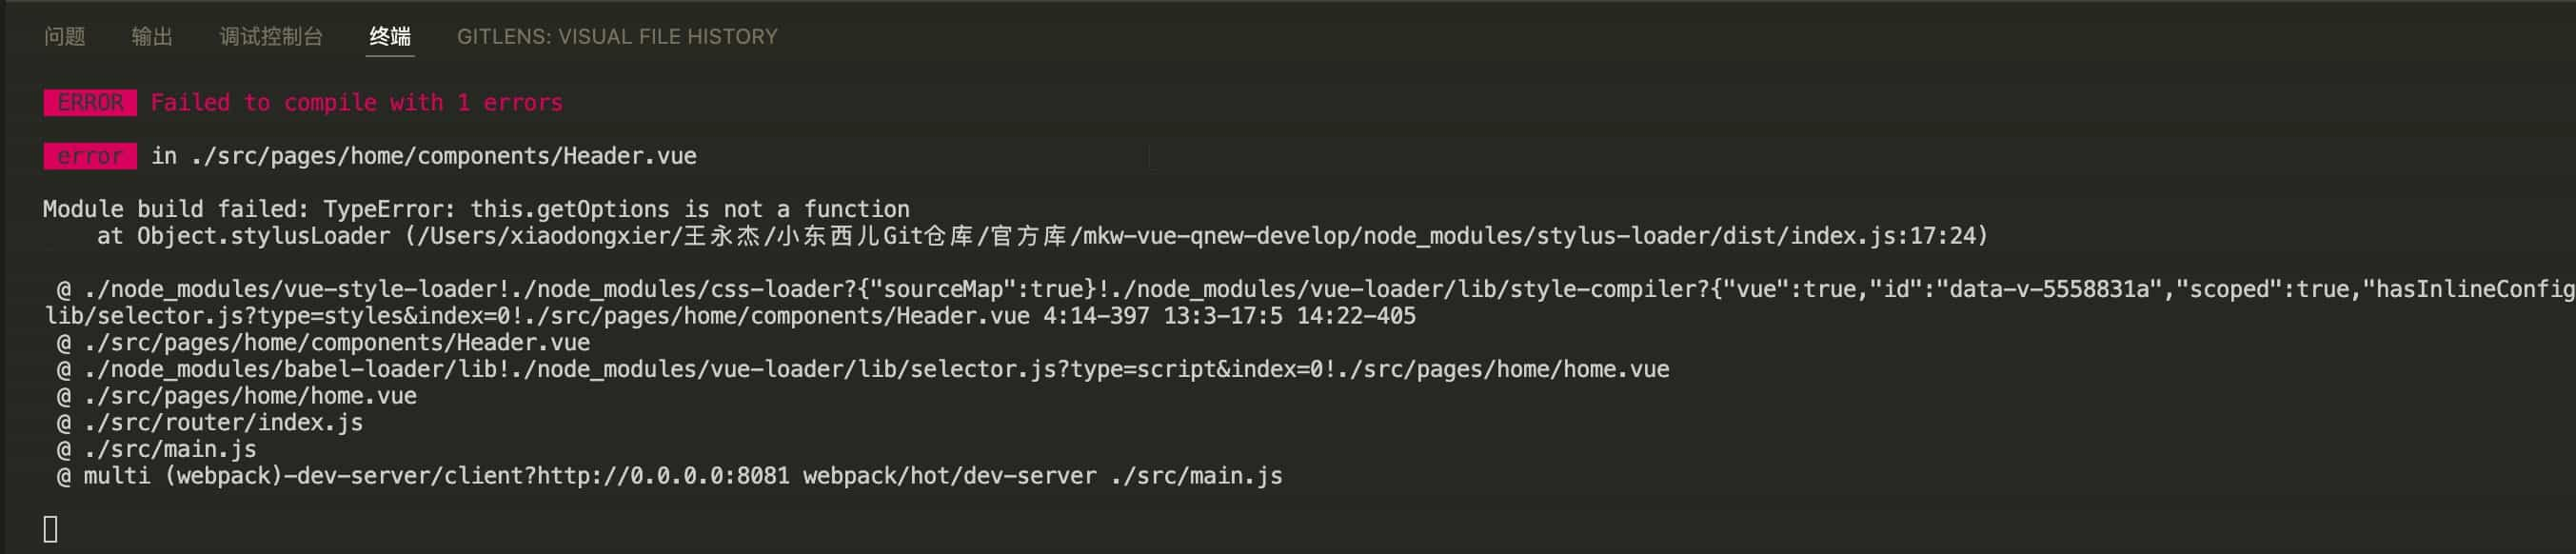
报错版本
解决方法:https://segmentfault.com/q/1010000025218065 ,下面的评论
stylus-loader 版本太高 把版本降到3.0.2就解决了最后贴一个GitHub issues的地址https://github.com/vuejs/vue-cli/issues/5947
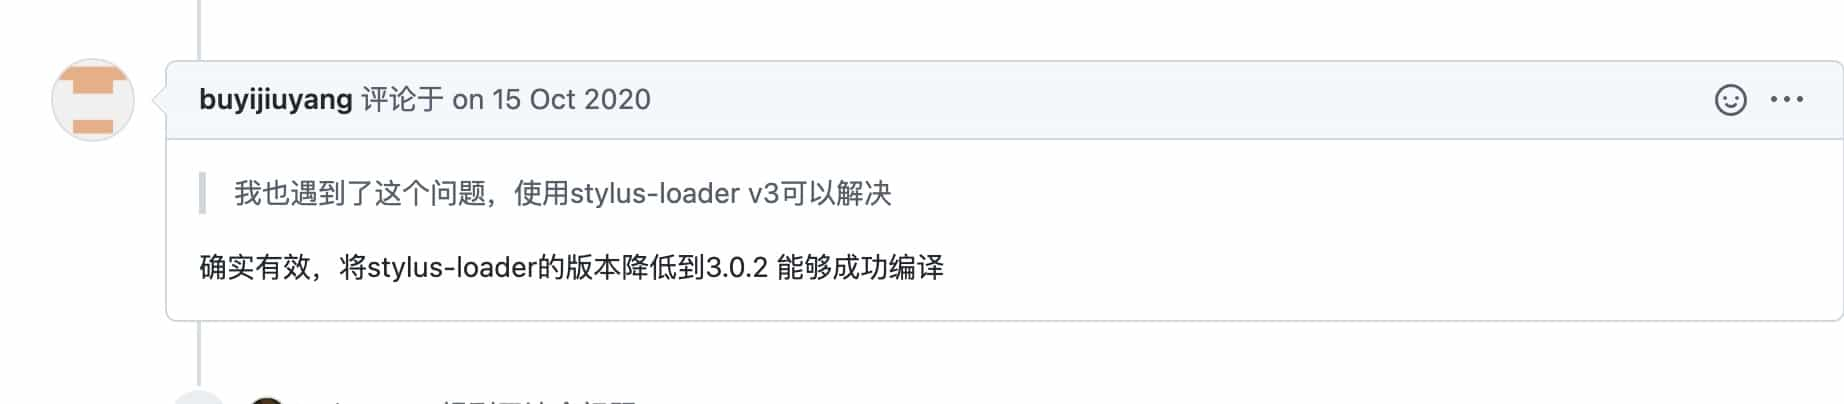
卸载命令 npm uninstall stylus-loader
安装3.0.2 版本
安装指定版本命令 npm i stylus-loader@3.0.2 --save
其他解决方法
方法1
- 不卸载之前的高版本
- 运行命令
npm i stylus-loader@3.0.2 --save
方法2
- 先在package.json里修改好指定版本号,然后输入
- 运行命令
npm update stylus-loader@3.0.2
scoped
限制 css 样式仅对当前组件有效
1
2
3
| <style lang="stylus" scoped>
</style>
|
知识点
1
2
| --save和--save-dev区别
一句话:--save-dev是你开发时依赖的东西,--save是发布后还依赖的东西.
|
注释事项
- 代码缩减问题
- 代码一行结束后面不能跟空格
7-2 Vue项目首页 - iconfont 的使用和代码优化
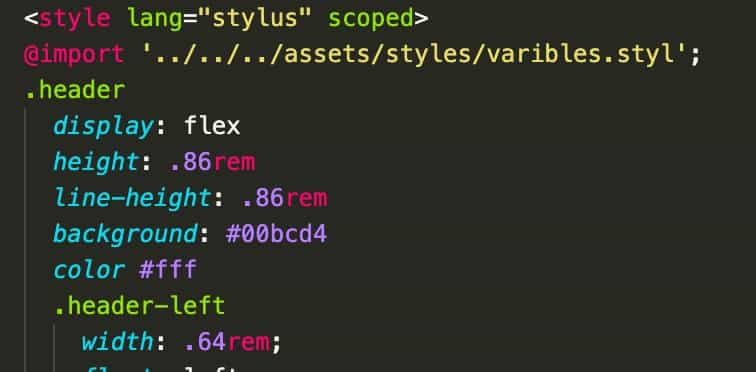
lang="stylus" css使用stylus语法
scoped css样式只对当前组建生效
iconfont的使用
iconfont 引入
1
| import './assets/styles/iconfont.css'
|
代码优化
css 色值放到一个变量里面 - 方便后期视觉主题维护 -提高可维护性,创建 styl 文件
样式里面引入样式 ,css引用需要使用 @import
1
2
3
| <style lang="stylus" scoped>
@import '../../../assets/styles/varibles.styl';
</style>
|
@ 代表 src 这个目录,但是在css引用其他的css使用的时候需要前面加~
1
2
3
| <style lang="stylus" scoped>
@import '~@/assets/styles/varibles.styl';
</style>
|
styles 文件夹路径使用比较高,起一个别名代替,类似上面的 @,使代码变得更加精简
找到build/webpack.base.conf.js这个文件(34行)
1
2
3
4
5
6
7
| resolve: {
extensions: ['.js', '.vue', '.json'],
alias: {
'vue$': 'vue/dist/vue.esm.js',
'@': resolve('src'),
}
},
|
根据上面的写法可以为styles路径新增一个别名
1
2
3
4
5
6
7
8
| resolve: {
extensions: ['.js', '.vue', '.json'],
alias: {
'vue$': 'vue/dist/vue.esm.js',
'@': resolve('src'),
'styles': resolve('src/assets/styles'),
}
},
|

修改后会有报错提示

这是因为项目修改配置项,需要重启下服务器
课程总结
- 如何在
Header 组建使用 iconfont
- 如何通过
webpack 对代码进行简化(文件夹路径)
- 如果在
styl 定义变量并在 css 中使用变量
7-3 【讨论题】对于静态资源,如何处理会比较优雅呢?
课下阅读官方文档 处理静态资源 章节内容
静态资源可以通过两种方式进行处理:
从相对路径导入 #
当你在 JavaScript、CSS 或 *.vue 文件中使用相对路径 (必须以 . 开头) 引用一个静态资源时,该资源将会被包含进入 webpack 的依赖图中。在其编译过程中,所有诸如 <img src="...">、background: url(...) 和 CSS @import 的资源 URL 都会被解析为一个模块依赖。
例如,url(./image.png) 会被翻译为 require('./image.png'),而:
1
2
| <img src="./image.png">
|
将会被编译到:
1
2
| h('img', { attrs: { src: require('./image.png') }})
|
在其内部,我们通过 webpack 的 Assets Modules 配置,用版本哈希值和正确的公共基础路径来决定最终的文件路径,并将小于 8KiB 的资源内联,以减少 HTTP 请求的数量。
你可以通过 chainWebpack 调整内联文件的大小限制。例如,下列代码会将内联图片资源限制设置为 4KiB:
1
2
3
4
5
6
7
8
9
10
11
12
13
|
module.exports = {
chainWebpack: config => {
config.module
.rule('images')
.set('parser', {
dataUrlCondition: {
maxSize: 4 * 1024
}
})
}
}
|
URL 转换规则 #
如果 URL 是一个绝对路径 (例如 /images/foo.png),它将会被保留不变。
如果 URL 以 . 开头,它会作为一个相对模块请求被解释且基于你的文件系统中的目录结构进行解析。
如果 URL 以 ~ 开头,其后的任何内容都会作为一个模块请求被解析。这意味着你甚至可以引用 Node 模块中的资源:
1
2
| <img src="~some-npm-package/foo.png">
|
如果 URL 以 @ 开头,它也会作为一个模块请求被解析。它的用处在于 Vue CLI 默认会设置一个指向 <projectRoot>/src 的别名 @。**(仅作用于模版中)**
public 文件夹 #
任何放置在 public 文件夹的静态资源都会被简单的复制,而不经过 webpack。你需要通过绝对路径来引用它们。
注意我们推荐将资源作为你的模块依赖图的一部分导入,这样它们会通过 webpack 的处理并获得如下好处:
- 脚本和样式表会被压缩且打包在一起,从而避免额外的网络请求。
- 文件丢失会直接在编译时报错,而不是到了用户端才产生 404 错误。
- 最终生成的文件名包含了内容哈希,因此你不必担心浏览器会缓存它们的老版本。
public 目录提供的是一个应急手段,当你通过绝对路径引用它时,留意应用将会部署到哪里。如果你的应用没有部署在域名的根部,那么你需要为你的 URL 配置 publicPath 前缀:
何时使用 public 文件夹 #
- 你需要在构建输出中指定一个文件的名字。
- 你有上千个图片,需要动态引用它们的路径。
- 有些库可能和 webpack 不兼容,这时你除了将其用一个独立的
<script> 标签引入没有别的选择。
7-4 Vue项目首页 - 首页轮播图
新建 index-swiper 分支
- 线上平台新建
index-swiper 分支
- 本地
git pull 拉取远程分支
- 本地
git checkout index-swiper 切换本地分支到 index-swiper 分支进行开发
轮播插件 vue-awesome-swiper
vue-awesome-swiper 插件介绍
安装 vue-awesome-swiper
1
| npm install vue-awesome-swiper --save
|
由于视频讲解版本问题,暂时采用下载 2.6.7 版本
1
| npm install vue-awesome-swiper@2.6.7 --save
|
使用方法 main.js 进行配置
1
2
3
4
5
6
7
|
import VueAwesomeSwiper from 'vue-awesome-swiper'
import 'swiper/dist/css/swiper.css'
Vue.use(VueAwesomeSwiper)
|
swiper.vue 组件开发使用 vue-awesome-swiper
1
2
3
4
5
6
7
8
9
10
11
12
13
14
15
16
17
18
19
20
21
22
23
24
25
26
27
28
|
<template>
<swiper :options="swiperOption">
<swiper-slide>
<img class="swiper-img" src="https://imgs.qunarzz.com/sight/source/1505/9e/21df651e19af5d.jpg_r_640x214_3ea5bb38.jpg" alt="">
</swiper-slide>
<swiper-slide>
<img class="swiper-img" src="https://imgs.qunarzz.com/sight/source/1510/6e/1ea71e2f04e.jpg_r_640x214_aa6f091d.jpg" alt="">
</swiper-slide>
<div class="swiper-pagination" slot="pagination"></div>
</swiper>
</template>
<script>
export default {
name: 'HomeSwiper',
data: function () {
return {
swiperOption: {}
}
}
}
</script>
<style lang="stylus" scoped>
.swiper-img
width 100%
</style>
|
加载抖动问题
轮播图片没加载成功的时候会不显示轮博区域,高度为0,当加载成功的时候会把下面部分挤下去,出现一个抖动的情况

1
2
3
4
5
6
7
8
9
10
11
12
13
14
15
16
17
18
19
20
21
22
23
24
25
26
27
28
29
30
31
32
33
34
35
36
| <template>
<div class="wrapper">
<swiper :options="swiperOption">
<swiper-slide>
<img class="swiper-img" src="https://imgs.qunarzz.com/sight/p0/1501/f4/f467729126949c3a.water.jpg_640x276_267de9bb.jpg" alt="">
</swiper-slide>
<swiper-slide>
<img class="swiper-img" src="https://imgs.qunarzz.com/sight/p0/1602/92/920e47352552c1c990.water.jpg_640x276_078119ce.jpg" alt="">
</swiper-slide>
<div class="swiper-pagination" slot="pagination"></div>
</swiper>
</div>
</template>
<script>
export default {
name: 'HomeSwiper',
data: function () {
return {
swiperOption: {}
}
}
}
</script>
<style lang="stylus" scoped>
.wrapper
width: 100%
height: 0
overflow: hidden
// 宽高比 276/640 = 43.12
padding-bottom: 43.12%
background-color: #eee
.swiper-img
width 100%
</style>
|
或者使用 vw 存在兼容问题
1
2
3
4
5
6
7
8
9
10
11
12
13
14
15
16
17
18
19
20
21
22
23
24
25
26
27
28
29
30
31
32
33
| <template>
<div class="wrapper">
<swiper :options="swiperOption">
<swiper-slide>
<img class="swiper-img" src="https://imgs.qunarzz.com/sight/source/1505/9e/21df651e19af5d.jpg_r_640x214_3ea5bb38.jpg" alt="">
</swiper-slide>
<swiper-slide>
<img class="swiper-img" src="https://imgs.qunarzz.com/sight/source/1510/6e/1ea71e2f04e.jpg_r_640x214_aa6f091d.jpg" alt="">
</swiper-slide>
<div class="swiper-pagination" slot="pagination"></div>
</swiper>
</div>
</template>
<script>
export default {
name: 'HomeSwiper',
data: function () {
return {
swiperOption: {}
}
}
}
</script>
<style lang="stylus" scoped>
.wrapper
width: 100%
// 宽高比 276/640 = 43.12
height: 43.12vw
.swiper-img
width 100%
</style>
|
pagination 设置
1
2
3
4
5
6
7
8
9
10
11
| export default {
name: 'HomeSwiper',
data: function () {
return {
swiperOption: {
pagination: '.swiper-pagination'
}
}
}
}
|
pagination 选中颜色设置
直接这样做是不生效的,因为不在一个组件中,css设置了 scoped 仅对当前组件生效css样式
1
2
3
4
5
6
7
8
9
10
11
12
| .wrapper
width: 100%
height: 0
overflow: hidden
// 宽高比 276/640 = 43.12
padding-bottom: 43.12%
background-color: #eee
.swiper-pagination-bullet-active
background-color: red !important
.swiper-img
width 100%
|
通过 .wrapper >>> .swiper-pagination-bullet-active 样式穿透来设置
1
2
3
4
5
6
7
8
9
10
11
12
13
14
| // 样式穿透
.wrapper >>> .swiper-pagination-bullet-active
background-color: #fff
.wrapper
width: 100%
height: 0
overflow: hidden
// 宽高比 276/640 = 43.12
padding-bottom: 43.12%
background-color: #eee
.swiper-pagination-bullet-active
background-color: red !important
.swiper-img
width 100%
|
回顾总结
vue-awesome-swipercss 轮播插件使用
pagination 设置pagination 颜色修改 (样式穿透)- 轮播数据放在
data 进行循环展示
- 轮播图加载空白抖动问题
- 轮播图变形问题(计算宽高比)
- 代码提交
- 先关闭服务
git add .
git commit -m "代码内容注释"
git push
- 分支合并(
main(master)) / git 目前新建项目默认分支不是 master,而是 main,其实意义一样
git checkout main - 先切换到主分支
git merge origin/index-swiper - 新增的内容合并到本地的 main(master) 分支
- git push 把本地
main(master) 分支内容提交到线上
main(master) 分支放置的是所有功能最新的代码,index-swiper 分支上放置的是开发的具体功能的代码,一般工作的开发流程是先自己开发一个分支,然后测试没有问题的时候,上线的时候会把开发的分支代码合并到main(master) 主分支上
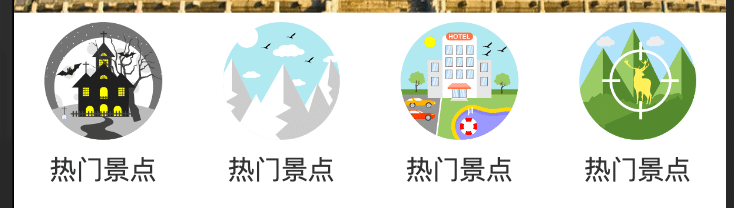
7-5 Vue项目首页 - 图标区域页面布局
css 布局设计实现
1
2
3
4
5
6
7
8
9
10
11
12
13
14
15
16
17
18
19
20
21
22
23
24
25
26
27
28
29
30
31
32
33
34
35
36
37
38
39
40
41
42
43
44
45
46
47
48
49
50
51
52
53
54
55
56
57
58
59
60
61
62
63
64
65
66
67
68
69
70
| <template>
<div class="icons">
<div class="icon">
<div class="icon-img">
<img class="icon-img-content" src="https://cdn.jsdelivr.net/gh/xiaodongxier/gitcdn@master/image/mkw-vue-qnew-develop/icons/icon1.png" alt="">
</div>
<p class="icon-desc">热门景点</p>
</div>
<div class="icon">
<div class="icon-img">
<img class="icon-img-content" src="https://cdn.jsdelivr.net/gh/xiaodongxier/gitcdn@master/image/mkw-vue-qnew-develop/icons/icon2.png" alt="">
</div>
<p class="icon-desc">热门景点</p>
</div>
<div class="icon">
<div class="icon-img">
<img class="icon-img-content" src="https://cdn.jsdelivr.net/gh/xiaodongxier/gitcdn@master/image/mkw-vue-qnew-develop/icons/icon3.png" alt="">
</div>
<p class="icon-desc">热门景点</p>
</div>
<div class="icon">
<div class="icon-img">
<img class="icon-img-content" src="https://cdn.jsdelivr.net/gh/xiaodongxier/gitcdn@master/image/mkw-vue-qnew-develop/icons/icon4.png" alt="">
</div>
<p class="icon-desc">热门景点</p>
</div>
</div>
</template>
<script>
export default {
name: 'Icons'
}
</script>
<style lang="stylus" scoped>
@import '~styles/varibles.styl';
.icons
overflow hidden
height:0
padding-bottom: 50%
.icon
position: relative
overflow: hidden
float: left
height: 0
width: 25%
padding-bottom: 25%
.icon-img
position: absolute
top: 0
left: 0
right: 0
bottom: .44rem
padding: .1rem
box-sizing: border-box
.icon-img-content
display: block
margin: 0 auto
height 100%
.icon-desc
position: absolute
left: 0
right: 0
bottom: 0
height: .44rem
line-height: .44rem
text-align: center
color: $darkTextColor
</style>
|
7-6 Vue项目首页 - 图标区域逻辑实现
高度处理(上半段滑动/下半段滑动都可以)
1
2
3
4
| .icons >>> .swiper-container
overflow hidden
height:0
padding-bottom: 50%
|
浏览器插件安装(需要科学上网)
Vue.js devtools

分页判断处理
根据数据项的不同,自动化的构建页码,实现多页切换的效果
逻辑部分
1
2
3
4
5
6
7
8
9
10
11
12
13
14
15
16
17
18
19
| computed: {
pages () {
const pages = []
this.iconList.forEach(function (item, index) {
const page = Math.floor(index / 8)
if (!pages[page]) {
pages[page] = []
}
pages[page].push(item)
})
return pages
}
}
|
超出文字省略号处理/封装
styl 提供的 mixin 封装 css 公用
1
2
3
4
| ellipsis()
overflow hidden
white-space: nowrap
text-overflow: ellipsis
|
1
2
3
4
5
6
7
8
9
10
11
12
13
14
| <style lang="stylus" scoped>
@import '~styles/mixins.styl';
.icon-desc
position: absolute
left: 0
right: 0
bottom: 0
height: .44rem
line-height: .44rem
text-align: center
color: $darkTextColor
// 封装方法使用
ellipsis()
</style>
|
分支合并
git checkout main - 切换到主分支git merge origin/index-icons - main 分支与线上的 index-icons 分支进行合并git push - 提交
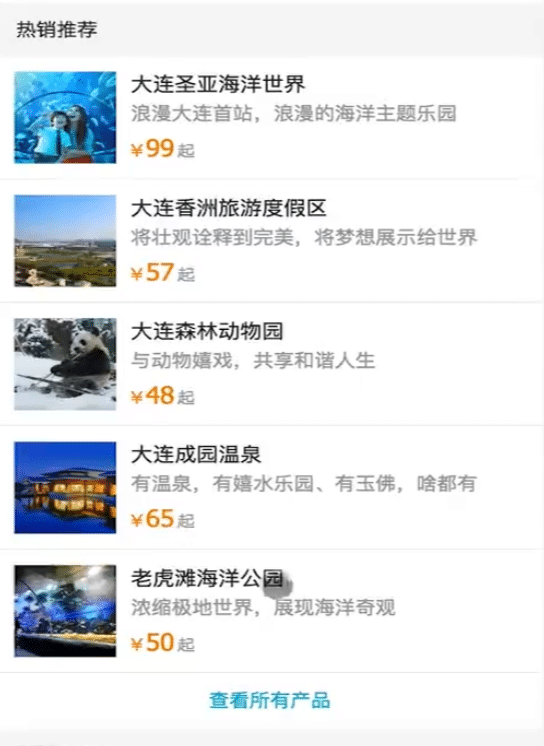
7-7 Vue项目首页 - 热销推荐组件开发
新建 Recommend 组件
1
2
3
4
5
6
7
8
9
10
11
12
13
14
15
16
17
18
19
20
21
22
23
24
25
26
27
28
29
30
31
32
33
34
35
36
37
38
39
40
41
42
43
44
45
46
47
48
49
50
51
52
53
54
55
56
57
58
59
60
61
62
63
64
65
66
67
68
69
70
71
72
73
74
75
76
77
78
79
80
81
82
83
84
85
86
87
88
89
90
91
92
93
94
95
96
97
98
99
| <template>
<div>
<div class="title">热销推荐</div>
<ul>
<li class="item border-bottom" v-for="item of recommendList" :key="item.id">
<img class="item-img" :src="item.imgUrl" alt="">
<div class="item-info">
<p class="item-title">{{item.title}}</p>
<p class="item-desc">{{item.desc}}</p>
<button class="item-buttom">查看详情</button>
</div>
</li>
</ul>
</div>
</template>
<script>
export default {
name: 'HomeRecommend',
data: function () {
return {
recommendList: [
{
id: '0001',
imgUrl: 'https://imgs.qunarzz.com/sight/p0/1409/19/adca619faaab0898245dc4ec482b5722.jpg_200x200_1bc99086.jpg',
title: '故宫博物院',
desc: '世界五大宫之首,穿越与您近在咫尺'
},
{
ia: '0002',
imgUrl: 'https://imgs.qunarzz.com/sight/p0/2005/39/3979f1867defec4ea3.water.jpg_200x200_325a015d.jpg',
title: '八达岭长城',
desc: '不到长城非好汉'
},
{
ia: '0003',
imgUrl: 'https://qimgs.qunarzz.com/piao_qsight_provider_piao_qsight_web/0100j1200087e9wb39FE1.jpg_200x200_e3180970.jpg',
title: '颐和园',
desc: '中国现存最大的皇家园林'
},
{
ia: '0004',
imgUrl: 'https://imgs.qunarzz.com/sight/p0/1507/cc/19733fc0135062788140cbb48ae606a7.water.jpg_200x200_d9ebe2fd.jpg',
title: '北京野生动物园',
desc: '敢与森林之王近距离接触吗?'
},
{
ia: '0005',
imgUrl: 'https://imgs.qunarzz.com/sight/p0/1505/f5/f5f45e1a83537bcb.water.jpg_200x200_444cc7e8.jpg',
title: '圆明园',
desc: '百年皇家的珍宝,民族耻辱的见证'
},
{
ia: '0006',
imgUrl: 'https://imgs.qunarzz.com/sight/p0/201405/12/51b63883c25f5d87af3c08bb016e2bd7.jpg_200x200_8eb33f07.jpg',
title: '恭王府',
desc: '一座恭王府,半部清代史'
}
]
}
}
}
</script>
<style lang="stylus" scoped>
@import '~styles/mixins.styl'
.title
margin-top: .2rem
background: #eee
line-height: .8rem
text-indent: 2em
.item
overflow hidden
display: flex
height: 1.9rem
.item-img
width 1.7rem
height 1.7rem
padding: .1rem
.item-info
flex: 1
padding: .1rem
min-width: 0
.item-title
line-height: .54rem
font-size: .32rem
ellipsis()
.item-desc
line-height: .4rem
color: #ccc
ellipsis()
.item-buttom
line-height: .44rem
margin-top: .16rem
background: #ff9300
padding: 0 .2rem
border-radius: .06rem
color #fff
</style>
|
1像素边框问题解决
直接给元素添加 class 为 border-bottom 即可
1
2
3
4
5
6
7
8
9
10
11
12
13
14
15
| <template>
<div>
<div class="title">热销推荐</div>
<ul>
<li class="item border-bottom" v-for="item of recommendList" :key="item.id">
<img class="item-img" :src="item.imgUrl" alt="">
<div class="item-info">
<p class="item-title">{{item.title}}</p>
<p class="item-desc">{{item.desc}}</p>
<button class="item-buttom">查看详情</button>
</div>
</li>
</ul>
</div>
</template>
|
文字溢出省略号显示问题/小技巧解决
使用 ellipsis(),然后父级元素给设置一个宽度 min-width: 0
1
2
| .item-info
min-width: 0
|
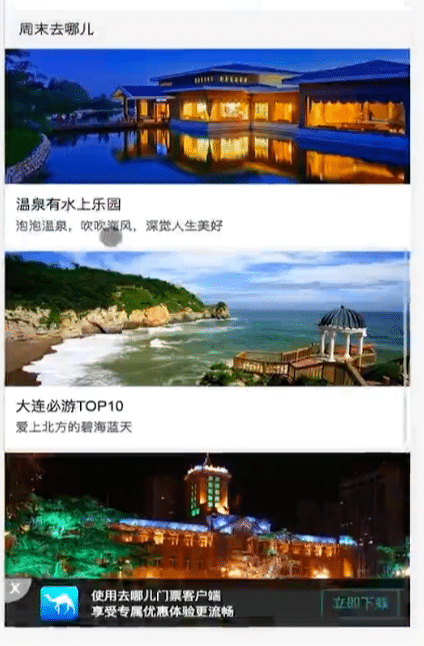
7-8 Vue项目首页 - 开发周末游组件
1
2
3
4
5
6
7
8
9
10
11
12
13
14
15
16
17
18
19
20
21
22
23
24
25
26
27
28
29
30
31
32
33
34
35
36
37
38
39
40
41
42
43
44
45
46
47
48
49
50
51
52
53
54
55
56
57
58
59
60
61
62
63
64
65
66
67
68
69
70
71
72
73
74
75
76
77
78
79
80
81
82
| <template>
<div>
<div class="title">周末去哪儿</div>
<ul>
<li class="item border-bottom" v-for="item of recommendList" :key="item.id">
<div class="item-img-wraper">
<img class="item-img" :src="item.imgUrl" alt="">
</div>
<div class="item-info">
<p class="item-title">{{item.title}}</p>
<p class="item-desc">{{item.desc}}</p>
</div>
</li>
</ul>
</div>
</template>
<script>
export default {
name: 'HomeRecommend',
data: function () {
return {
recommendList: [
{
id: '0001',
imgUrl: 'https://imgs.qunarzz.com/sight/source/1510/6e/1ea71e2f04e.jpg_r_640x214_aa6f091d.jpg',
title: '京城有好泉',
desc: '细数北京温泉,温暖你的冬天'
},
{
ia: '0002',
imgUrl: 'https://imgs.qunarzz.com/sight/source/1811/f3/86173f863bef61.jpg_r_640x214_52b003ac.jpg',
title: '京城周末撒欢',
desc: '在帝都过周末,不仅仅是城中游!'
},
{
ia: '0003',
imgUrl: 'https://imgs.qunarzz.com/sight/source/1811/7e/476589267ebb41.jpg_r_640x214_bf599709.jpg',
title: '京城溜娃必去',
desc: '德智体美劳全面发展的亲子日,这些地方该去看看…'
},
{
ia: '0004',
imgUrl: 'https://imgs.qunarzz.com/sight/source/1505/aa/7baaf8a851d221.jpg_r_640x214_1431200f.jpg',
title: '北京野生动物园',
desc: '敢与森林之王近距离接触吗?'
},
{
ia: '0005',
imgUrl: 'https://imgs.qunarzz.com/sight/source/1505/9e/21df651e19af5d.jpg_r_640x214_3ea5bb38.jpg',
title: '寻找北京的皇城范儿',
desc: '数百年的宫廷庙宇,至今依旧威严霸气'
}
]
}
}
}
</script>
<style lang="stylus" scoped>
@import '~styles/mixins.styl'
.title
margin-top: .2rem
background: #eee
line-height: .8rem
text-indent: 2em
.item-img-wraper
height:0
overflow: hidden
padding-bottom: 33.9%
.item-img
width: 100%
.item-info
padding: .1rem
.item-title
line-height: .54rem
font-size: .32rem
ellipsis()
.item-desc
line-height: .4rem
color: #ccc
ellipsis()
</style>
|
- HOME 组件拆分
header 组件swiper 组件icons 组件recommend 组件weekend 组件
slot 的使用
组件内传入了很多内容,都是通过 slot 的方式把页面的数据传递给 swiper
课下阅读官方文档 slot 章节内容
7-9 Vue项目首页 - 使用 axios 发送 ajax 请求
axios 数据请求,可是实现跨平台数据请求
之前的方法有
fetch - 浏览器自带的函数vue-resource - 第三方的模块
新建 index-ajax 分支
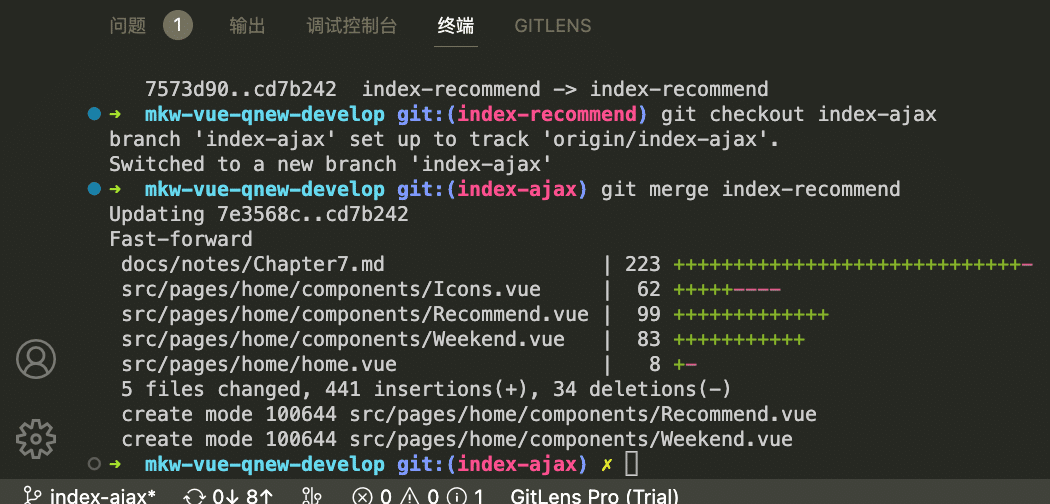
上章内容忘记合并主分支,而 index-ajax 分支是从主分支复制过来的,所以本分支缺少上节 index-commend 分支内容,处理办法,通过下面命令
把 index-commend 分支内容,融合到 index-ajax 分支
安装 axios
使用 axios
子组件使用 axios 获取数据的话需要至少发起5次 ajax 请求,会导致性能不好,所以把 ajax 请求放在 Home.vue 中的 mounted 生命周期函数中即可
Home.vue 组件发起 ajax 请求,然后通过组件传递把数据传递给每个子组件
1
| import axios from 'axios'
|
数据获取
1
2
3
4
5
6
7
8
9
10
11
| methods: {
getHomeInfo: function () {
axios.get('/static/mock/index.json')
.then(this.getHomeInfoSucc)
},
getHomeInfoSucc: function (data) {
console.log(data)
}
},
mounted: function () {
this.getHomeInfo()
|
数据模拟
static 目录存放静态文件,创建 mock 文件夹放置模拟数据文件
- 问:为什么放置在
static 目录下?
- 答:只有
static 目录下的文件才能被外部访问,其他目录下的文件会被重定向到首页
模拟数据屏蔽提交到线上
.gitignore 内添加 static/mock,以防止提交到线上
也不会提交到本地的仓库
转发机制,代理
不是 vue 提供的,是 webpak-dev-server 提供的
1
2
3
4
5
6
7
8
9
10
11
12
| methods: {
getHomeInfo: function () {
axios.get('/static/mock/index.json')
.then(this.getHomeInfoSucc)
},
getHomeInfoSucc: function (data) {
console.log(data)
}
},
mounted: function () {
this.getHomeInfo()
}
|
正式开发环境请求路径应该如下这样,axios.get('/api/index.json')
1
2
3
4
5
6
7
8
9
10
11
12
| methods: {
getHomeInfo: function () {
axios.get('/api/index.json')
.then(this.getHomeInfoSucc)
},
getHomeInfoSucc: function (data) {
console.log(data)
}
},
mounted: function () {
this.getHomeInfo()
}
|
config 目录下 index.js 文件
proxyTable 配置项
1
2
3
4
5
6
7
8
9
10
11
12
| proxyTable: {
'/api': {
target: 'http://localhost:8080',
pathRewrite: {
'^/api': '/static/mock/'
}
}
}
|
是 webpak-dev-server 提供的
当改完配置项文件的时候,需要重启下服务器
模拟数据使用
1
2
3
4
5
6
|
"ret": true
"data": {
}
|
注意项:
json 数据结束后面会多写一个逗号,导致解析失败
遗留问题解决
周末去哪儿模块上面多一个白色区块
Weekend.vue 中 title 去掉 margin-top: .2rem
7-10 Vue项目首页 - 首页父子组组件间传值
父组件向子组件传值: 通过属性的形式传递
子组件通过props的方式接受传递的值
1
2
3
4
| export default {
name: 'HomeHeader',
props: ['city']
}
|
或者定义传递值的类型
1
2
3
4
5
6
| export default {
name: 'HomeHeader',
props: {
city: String
}
}
|
swiper 部分
1
2
3
4
5
6
7
8
9
10
11
12
13
14
15
16
17
18
19
20
21
22
23
24
25
26
27
| export default {
name: 'HomeSwiper',
props: {
list: Array
},
data: function () {
return {
swiperOption: {
pagination: '.swiper-pagination',
loop: false
}
}
}
}
|
打开直接显示最后一帧问题?
当页面还没获取到ajax数据的时候swiper已经执行了,接收到的是空数组,
刚开始swiper创建的时候是空数组创建的,后来ajax接收到数据后,重新渲染了就出现了现实最后一个图片的问题
所以创建swiper应该等完整数据获取完成后在来创建,通过v-if来判断解决这个问题,v-if这个值用list.length 来判断,当数据获取为空的时候v-if为false,对应的swiper也不会被创建,当获取完数据后对应的值为ture,对应的swiper会被创建,就解决了上面存在的问题
1
2
3
4
5
6
7
8
9
10
11
12
13
| <template>
<div class="wrapper">
<swiper :options="swiperOption" v-if="list.length">
<swiper-slide v-for="item of list" :key="item.id">
<img class="swiper-img" :src="item.imgUrl" alt="">
</swiper-slide>
<div class="swiper-pagination" slot="pagination"></div>
</swiper>
</div>
</template>
|
模版里面尽量避免出现逻辑性的代码(例如上面)
最优方案如下:
1
2
3
4
5
6
7
8
9
10
11
| <template>
<div class="wrapper">
<swiper :options="swiperOption" v-if="showSwipeer">
<swiper-slide v-for="item of list" :key="item.id">
<img class="swiper-img" :src="item.imgUrl" alt="">
</swiper-slide>
<div class="swiper-pagination" slot="pagination"></div>
</swiper>
</div>
</template>
|
1
2
3
4
5
6
7
8
9
10
11
12
13
14
15
16
17
18
19
20
| export default {
name: 'HomeSwiper',
props: {
list: Array
},
data: function () {
return {
swiperOption: {
pagination: '.swiper-pagination',
loop: false
}
}
},
computed: {
showSwipeer: function () {
return this.list.length
}
}
}
|
自动轮博问题解决
1
2
3
4
5
6
7
8
9
10
11
12
13
14
15
| <template>
<div class="icons">
<swiper :options="swiperOption">
<swiper-slide v-for="(page, index) of pages" :key="index">
<div class="icon" v-for="item of page" :key="item.id">
<div class="icon-img">
<img class="icon-img-content" :src="item.imgUrl" alt="">
</div>
<p class="icon-desc">{{item.desc}}</p>
</div>
</swiper-slide>
</swiper>
</div>
</template>
|
1
2
3
4
5
6
7
8
9
10
11
12
13
14
| export default {
name: 'homeIcons',
props: {
list: Array
},
data: function () {
return {
swiperOption: {
autoplay: false
}
}
}
}
|
Recommend 部分
1
2
3
4
5
6
7
| export default {
name: 'HomeRecommend',
props: {
list: Array
}
}
|
Weekend 部分
1
2
3
4
5
6
7
| export default {
name: 'HomeRecommend',
props: {
list: Array
}
}
|